How to Turn Product Photos Into a Video (Free, No Filming)
Turn your product photos into a short AI video for free — no camera, no filming. The exact steps, the prompt formula, and three copy-paste prompt examples.
The short answer
To turn photos into video you don't animate the photo itself — you use the photo as a reference frame and let an AI video model build a short 3–5 second clip around it. The photo tells the model exactly what your product looks like; a written prompt tells it how to move the camera, light the scene, and what the product should do. Get both right and the output looks like your real product in motion, not a generic stock render.
The fastest free way to do this for a product is to upload your photos to the dropshipping video generator: it reads your images, writes the structured prompt for you, and hands you a reference-keyframe prompt to anchor the video to your actual product. The rest of this guide explains what it's doing under the hood so you can steer it.
Why turn a product photo into a video at all
A photo shows a product. A video shows the product being real — its scale, its texture, how the light catches it, how it moves in a hand. That is the gap between a shopper hesitating and a shopper buying, and it is why, in survey after survey of online shoppers, video-marketing research finds people are more likely to buy after watching a product video than after seeing photos alone. The problem has never been whether video helps; it is that filming a product you only drop-ship is impractical, and a UGC creator charges $150–$300 with a week of turnaround.
Turning your existing photos into video removes both barriers. You already have supplier or catalogue images — the same ones on your listing. Those are the only raw material you need.
I tested it: a better product image changes everything
I don't write this from theory. Over the past year I've turned hundreds of product photos into short videos — for ecommerce stores and inside Studio AI — and shipped them to real product pages and TikTok. The lesson I kept relearning: the video model is almost never the bottleneck. Your inputs are. And the input that matters before anything else is the product image you start from.
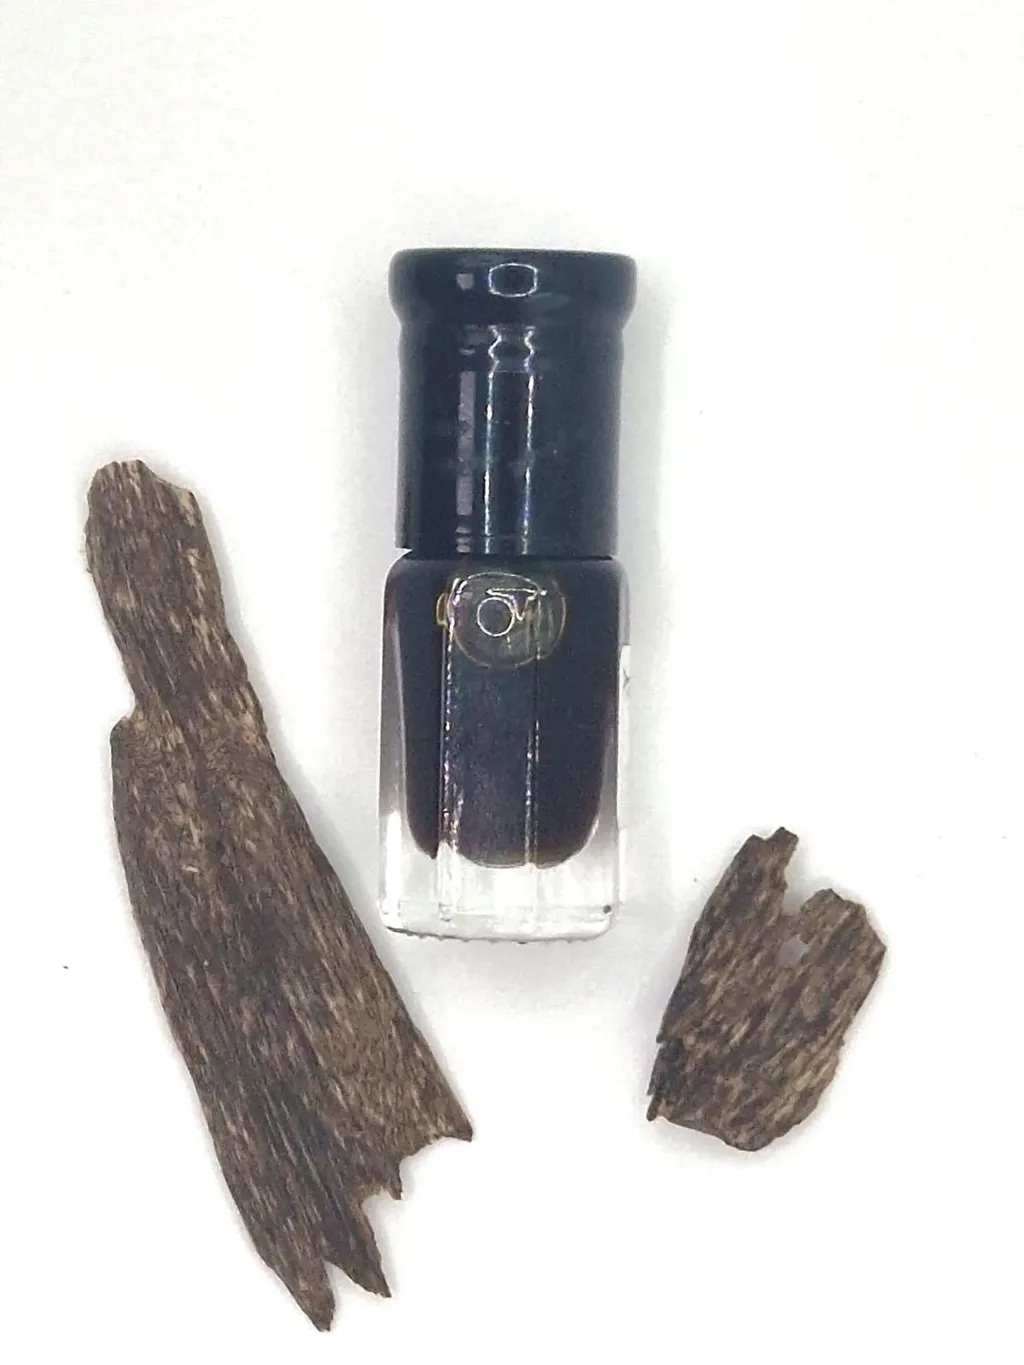
Most dropshipping photos are raw supplier shots — flat lighting, props scattered on a white background. I took one of those (a perfume bottle, shot next to a couple of agarwood chips) and had AI turn it into a proper product image of the exact same bottle. Same product. Here is the before and after.
Step 1 — the product image (this is what the AI builds from)
An image-to-video model can only animate what it understands, and its understanding of your product is only as good as the image you feed it. A raw supplier photo hands it a muddy idea of the product; a clean, professional image hands it a precise one — and it converts better as a still on its own. Same perfume, two product images:

That single upgrade does three things at once: it professionalizes the listing, it lifts conversion on the image alone, and it hands the video model a far better starting frame — which is the whole game, because the model builds every frame of the clip out of that one.
Step 2 — then you animate the good one
With a clean product image as the starting frame, the model finally has something solid to move the camera around — a 3–5 second clip built from a strong image needs almost no fixing. That is the whole workflow: fix the image, then animate it. The rest of this guide is how to write the prompt that turns that image into the clip.
What I took away
Garbage in, garbage out. Fix the product image first — it's the foundation the whole video is built on, and it lifts conversion before you even hit record. The second lever is the prompt, and it matters just as much. That's next.
The second lever: the prompt
Once your product image is solid, the prompt is what decides everything else — and you can see it on a single still, no video needed. It works the same for a lifestyle shot or a product shot. Both images below were generated in Studio AI's Flow; the only thing that changed was the prompt.

Same lever, one level up. Name the camera, the setting, and the mood and the model gives you something intentional and believable; ask vaguely and you get a generic render. For a product photo that is exactly the gap between a keyframe that looks like your real listing and one that looks like stock — and since the keyframe is what your video is built from, it decides everything downstream.
What you need before you start
One to three clear product photos
Well-lit shots of the product on a plain background work best — the same images you'd put on a listing. Multiple angles give the AI more to work with. Blurry, watermarked, or heavily collaged supplier images are the most common reason output looks off.
A prompt (the part most people skip)
The single biggest factor in whether the clip looks like your product or like generic AI footage. You can write it yourself using the formula below, or let the free tool generate it from your photos.
An AI video model to render it
Image-to-video models — Kling, Runway, Veo, SeeDance — take a starting image plus a prompt and produce the clip. Most have a free tier; more on choosing one below.
How to turn product photos into a video, step by step
- Pick your strongest photo as the keyframe. This is the first frame the video grows from. Choose the one where the product is clearest and largest in the frame — the model preserves whatever is in this image.
- Write (or generate) the prompt. Describe the camera move, the lighting, the single motion, and what to exclude. The product video generator does this automatically from your uploaded photos and also gives you a separate reference-keyframe prompt.
- Run image-to-video. In Kling use Reference Image, in Runway use Image-to-Video, in Veo upload the frame — then paste your prompt. Render a 3–5 second clip.
- Pick the aspect ratio for where it's going. 9:16 for TikTok and Reels, 1:1 or 4:5 for a Shopify product gallery. Same prompt, just change the ratio.
- Generate two or three variants and keep the best. AI video is cheap to iterate. Vary the camera move or the hook and keep the clip that holds attention.
The prompt is everything: the five-part formula
AI video models are brutally sensitive to prompt quality. A one-line prompt like “product video of a water bottle” produces generic stock footage. The same model with a structured brief produces something that looks like your listing. Five parts matter:
1. Camera — gear, lens, and movement
State the shot explicitly: 'macro lens, slow 180° orbit' or 'static tripod, gentle push-in'. Vague prompts default to busy, drifting camera moves that look amateur.
2. Lighting — set the mood in one line
'Soft diffused studio light' reads premium; 'warm window light on a kitchen counter' reads lifestyle. Lighting is half of why a clip looks expensive or cheap.
3. Subject and action — one motion only
In 3–5 seconds you get one beat. 'The bottle rotates once to reveal the logo' beats trying to show five features. Decide the single thing the clip proves.
4. Style tags — match the platform
'UGC, handheld, natural' for TikTok; 'clean, minimal, e-commerce' for a product page. Tags steer the overall feel without you describing every frame.
5. Negative prompt — what to exclude
The highest-leverage line most people omit. 'No text overlays, no extra hands, no warping, no fast cuts, no logo distortion' stops the model adding the artefacts that scream AI.
Before and after: the same product, two prompts
Here is the difference the formula makes for a single photo of a stainless-steel insulated water bottle.
One-line prompt → generic
product video of a water bottle, nice lighting, high quality
Structured prompt → looks like your product
Macro lens, slow 90° orbit around a brushed stainless-steel insulated water bottle on a pale stone surface. Soft diffused studio light, condensation beading on the metal. The bottle stays perfectly centred as the camera arcs, catching a clean highlight along its edge. Minimal, premium e-commerce style. Negative: no text, no hands, no warping, no extra objects, no fast cuts, no logo distortion.
Three copy-paste prompts for common product types
Swap in your own product and reuse these as starting points. Each is built for a single 3–5 second clip with one motion.
Gadget / problem-solver (e.g. posture corrector, organiser)
Handheld UGC-style shot, natural daylight, a pair of hands placing the product into use on a desk. Quick, satisfying motion that shows the problem being solved in one beat. Authentic, slightly imperfect framing like a real TikTok. Negative: no text overlays, no studio gloss, no extra hands, no warping, no fast cuts.
Fashion / lifestyle (e.g. jewellery, apparel, home décor)
Cinematic slow push-in, warm golden-hour window light, the product worn or styled in a real lifestyle setting. Shallow depth of field, the product crisp against a soft background. Aspirational, premium mood. Negative: no text, no distorted faces, no warping fabric, no extra limbs, no harsh flicker.
Tech / feature-heavy (e.g. kitchen gadget, electronics)
Clean static tripod shot with a slow push-in, bright even studio light on a seamless white surface. The product performs its single key function once, clearly and centred. Crisp, minimal e-commerce style. Negative: no text overlays, no hands obscuring the product, no warping, no reflections distorting the shape, no fast cuts.
Don't want to write these by hand? The free product video generator reads your photos, picks the right angle for your product, and writes the full prompt — including the negative prompt and a reference keyframe — in about 30 seconds.
Which AI video tool should you render it in?
Any image-to-video model works with the prompt above — Kling tends to be strongest for UGC-style motion, Runway for precise product demos, Veo for lifestyle realism. The catch is cost: most standalone tools run $20–$40+ a month once you generate at any volume.
Creative Fabrica's Studio AI runs several of these models in one place, has a free tier, and starts at around €4/month — a fraction of what most dedicated AI video tools charge, which matters when you're testing several products a month. When you generate a prompt with our free tools, we hand it straight to Studio AI with your settings pre-filled so you can render without copy-pasting.
Where the video goes: quick specs
| Destination | Aspect ratio | Length |
|---|---|---|
| TikTok / TikTok Shop | 9:16 vertical | 3–15s |
| Instagram Reels | 9:16 vertical | 3–15s |
| Shopify product gallery | 1:1 or 4:5 | 3–10s |
| Amazon listing | 16:9 or 1:1 | 15–30s |
Each platform has its own rules for product video — for example, Shopify's product-media docs cover supported formats and sizes. Selling on a specific platform? We have dedicated generators that size the video correctly for each one: Shopify, Amazon, and Etsy.
Common mistakes that make the video look fake
- No reference image. Text-only prompts invent a product that isn't yours. Always start from your photo.
- No negative prompt. This is what stops warped logos, phantom hands, and text artefacts.
- Too much in 5 seconds. One motion, one beat. Multi-scene prompts fall apart.
- Busy backgrounds. Keep the product the clear hero; clutter confuses the model and the shopper.
- Over-directed camera. One deliberate move beats zoom-plus-pan-plus-shake.
TikTok and TikTok Shop are trademarks of ByteDance Ltd. Shopify is a trademark of Shopify Inc. Instagram is a trademark of Meta Platforms, Inc. Amazon and Etsy are trademarks of their respective owners. This guide is not affiliated with or endorsed by any platform mentioned.
Frequently asked questions
Can I really turn a single photo into a video?
Yes. Image-to-video AI models use your photo as the starting frame and generate motion around it — a camera move, the product rotating, light shifting. You don't animate the flat photo; the model builds a short 3–5 second clip that keeps your product looking like the original image. One clear photo is enough, though two or three angles give better results.
Is it free to turn photos into a video?
Writing the prompt is completely free with our tool — upload your photos and get a structured video prompt plus a reference keyframe, no signup. Rendering the actual video happens in an AI video model; most have a free tier. Creative Fabrica's Studio AI runs several models, has a free tier, and starts around €4/month if you need volume.
Why does my AI video look generic instead of like my product?
Two reasons, almost always. First, no reference image — a text-only prompt invents a product that isn't yours, so always start from your photo as the keyframe. Second, a weak prompt with no negative line, which lets the model add warped logos, phantom hands, and text artefacts. A structured prompt with a negative prompt fixes both.
Which AI tool turns photos into video best?
Any image-to-video model works: Kling is strong for UGC-style motion, Runway for precise product demos, Veo for lifestyle realism. The bigger difference is cost — standalone tools run $20–$40+/month at volume, while Studio AI bundles several models with a free tier from about €4/month.
How long should a product video from photos be?
Short — 3 to 5 seconds. That's long enough to show the product and one selling detail, short enough to loop in a TikTok feed or autoplay on a product page, and it's where today's AI video models produce their cleanest motion. Build each clip around a single beat rather than a multi-scene story.
What photos work best for turning into a video?
Clear, well-lit shots of the product on a plain background — the same images you'd use on a listing. Avoid watermarked, blurry, or heavily collaged supplier images, which are the most common reason output looks off. Upload up to three angles so the AI has more to work with.